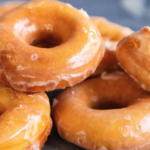
Classic Glazed Doughnut Recipe
If you’re looking for the perfect homemade version of a Krispy Kreme glazed doughnut, you’ve come to the right place.
Ingredients
For the doughnuts:
- 10 tbsp (150ml) milk
- 1 ⅛ tsp ½ a pack, or 3.5g active dry yeast
- 2 tbsp sugar
- 1 egg
- 4 tbsp butter melted
- ½ tsp salt
- 2 ½ cups (325g) all-purpose flour
For the glaze:
- 2 cups (250g) confectioners' (powdered) sugar
- 4-5 tbsp milk
- 1 tsp vanilla extract
- Pinch of salt not in the video, but I always do it!
Instructions
- For the doughnuts, add the milk to a medium sized bowl. It should be warm, around 30-40 degrees, just heat it up in the microwave for around 10 seconds.
- Next, sprinkle in 2 tbsp of granulated sugar, followed by the instant yeast. Give the mixture a quick stir and let it sit for around five minutes.
- Then whisk in the melted butter, egg and 1/2 tsp of salt. The mixture might look a little lumpy, but it will come together once the rest of the ingredients are added.
- Spoon in the flour, you’ll want to do this a little at a time – it just makes it easier to incorporate.
- The resulting dough should be thick, soft and should pull always slightly from the bowl. If it’s too sticky, add a tiny bit of flour to help- but not too much as it will dry out the dough and result in a tougher doughnut.
- Work the dough on a dry surface for around two minutes, till it comes together in a nice ball.
- Place the dough into a bowl that has lightly been greased with some flavourless oil. Then brush the top of the dough with some oil as well.
- Cover the bowl with a piece of plastic wrap, and leave it in a relatively warm place till it’s doubled in size, around an hour to two hours.
- When it’s risen nicely, lightly flour a work surface, and gently remove the dough from the bowl. Roll it out to about ½ inch or 1 cm thickness.
- Then cut out the doughnuts using a greased cookie cutter. I like the larger one to be 5 cm (around 2.5-3 inches), and the small one to be 2 cm (around 1 inch).
- If you don't have cookie cutters, you can use a regular drinking glass as the larger ring, just make sure it’s greased, and a bottle cap for the smaller ring. You can also keep the little doughnut holes to fry up as well.
- Whatever scraps you can left with, bunch them up and roll them out once more, being careful not to add too much extra flour.
- Gently place the little rounds onto a lightly floured surface, then cover them with a tea towel. Let the doughnuts rise again for around 45 minutes while you prepare the glaze.
- To make the glaze, mix together the sugar with the vanilla and 4 tbsp of the milk, until it's nice and smooth, the consistency of caramel sauce. Add a little more milk if it's too thick for your liking, and a dash extra of vanilla if you want. You can also throw in a pinch of salt for that salty-sweet combo.
- After 45 minutes or so, you're ready to fry the doughnuts.
- To fry the doughnuts, heat a medium sized pot with oil. 1 - 1 /2 cups is perfect, I recommend starting this around 10 minutes before you intend to fry. The oil should be hot, about 375 F or 190 C.
- Gently place the risen doughnut into the oil. I like to fry up 2-3 doughnuts at a time. Cook them for around 45 seconds 1 minute on each side, or until they've developed a nice golden brown colour. Use a metal slotted spoon to do this.
- Next, glide the doughnuts onto a paper-towel lined plate so that the excess oil can drain off.
- While the doughnuts are still hot (but not too hot to handle), dip them in the glaze, coating both sides.
- Place the glazed doughnut onto a wire rack, so that the extra icing can drip off.
- The glaze will harden after a while as the doughnuts cool.
- The dough itself can be stored overnight, covered in the fridge. However, these doughnuts must be eaten fresh, as the longer you wait, the more stale they will go, so make sure to fry them right before eating.
Notes
Adapted from Mark Bittman